Following are the steps to guide a user through utilising the new feature set surrounding Parts Categories, what they are and how to upload Parts Categories into the Partful platform.
Contents:
Definitions
Parts Categories
A Parts Category is an element that can be added into your product’s hierarchy, in order that existing assemblies and parts from your CAD model can be arranged into logical and organised groups, to assist with a user’s journey through your product to identify the assembly or part(s) that they are looking for.
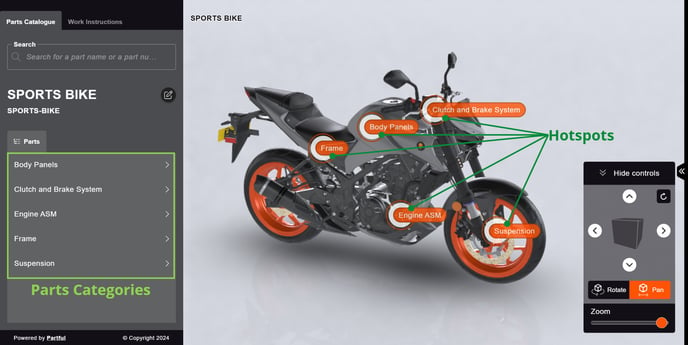
The Parts Categories that you add into your product’s hierarchy will display in your Parts Catalogue both in the left hand navigation bar and as a hotspot on the 3D canvas.
Hotspots
A hotspot is the name for the floating label that shows on your product in the 3D canvas. This displays the Parts Category that you have assigned to assemblies and/or parts as a clickable element on the canvas. It also corresponds to the same Parts Category that displays on the left hand navigation bar within the Parts Catalogue.
Introduction
As part of creating new products for your Partful parts catalogue, you may wish to rename some of the existing assemblies from your CAD, or even add new Parts Categories to your product and organise specific assemblies and parts into those new Parts Categories, so that your end user/buyer can follow the optimal journey through your product in order to most efficiently identify the assemblies and parts that they may want to order.
For example, on the image above, all the assemblies and parts for this product have been grouped under five main Parts Categories:
-
Body Panels
-
Clutch and Brake System
-
Engine ASM (Assembly)
-
Frame
-
Suspension
Important Note: You should ensure that you have successfully uploaded a Sales BOM and are satisfied with your sales content for your product first, before creating Parts Categories and assigning parts to them.
See the associated articles for more detail on these processes:
Creating Parts Categories
-
To begin the process of creating Parts Categories for a product, and grouping the existing assemblies and parts under them, first click on the Manage Product button on the product tile in the Product Library, then click on Parts Categories from the left hand actions menu:
-
On the left side of the Part Categories page, you will be able to view a diagram of the current hierarchy of your product. From here, click the Download Parts Categories File button to export this current hierarchy and the product details into a spreadsheet:
Understanding the Parts Categories File
The spreadsheet acts as both a list of the assemblies and parts that make up your product, arranged in the current hierarchy of the product (if this is your first time managing Parts Categories for the product, then this will reflect the original CAD hierarchy) and as a template into which you can enter the Parts Categories that you want to add next to the assemblies and parts that you want to group under them:
In the Assemblies and Parts Hierarchy section of the file (highlighted in yellow above), the current hierarchy of your product is documented. A “1” in this section shows that an assembly or part is at the top level of the hierarchy.
Where an assembly or part shows a “2”, this shows that this part is at the second level down in the hierarchy, beneath the level 1 assembly that is positioned directly above it in the hierarchy.
Where an assembly or part shows a “3”, this shows that this part is at the third level down in the hierarchy, beneath the level 2 assembly that is positioned directly above it in the hierarchy.
This continues for as many levels deep as your current hierarchy goes.
Example: The file below demonstrates this, where the “Engine ASM” is an assembly at the top level of the current hierarchy (1), with the “Battery Kit” as an assembly under that (2), and then all the parts at level 3 are grouped within the “Battery Kit” assembly:
The Part Details section of the file (highlighted in green above) provides you with the identifiers for each part.
-
The Type column helps you to see at a glance whether the item is an assembly or individual part, to make it quicker and easier to apply your desired Parts Categories hierarchy to the file.
-
The Engineering Part Number, Sales Part Number, Part Name and Quantity all help to identify each item and how many of that item exist at that specific part of the hierarchy (eg. the same part might appear multiple times in the file if that same part is used at multiple levels of the product hierarchy).
In the Parts Category Hierarchy section of the file (highlighted in blue above) you can enter the Parts Categories against each part to show which Parts Categories/Hotspots the end user/buyer will click through in your Parts Catalogue in order to find and identify that part.
Important Note: You do not need to/should not change anything including and to the left of the “Quantity” column in the file (shown in red below). You only need to populate the “Combine Assembly with…Category” and “Category Levels” columns in the file (shown in green below), in order to apply the changes you want to make.
Handy Tip: In the template we start you off with 5 levels of category columns, as most of the products that we have curated for our clients up to now have not gone more than 5 levels deep, with between 1 and 3 levels being the most popular choices, to keep the journey and the number of clicks that it takes your end user/buyer to reach a part as simple/minimal as possible.
However if you have a larger or more complex product, you can add further Category Level columns to the spreadsheet as needed - simply continue on by adding additional columns at the right of the spreadsheet, such as in the example below:
Combining Assemblies and Parts Categories
As in the “Engine ASM” example on the “Sports Bike” product above, you may have existing assemblies in your product hierarchy that you wish to act as a Parts Category/Hotspot rather than having the assembly sit under a Parts Category. This can be achieved in the Parts Categories file, by entering the Parts Category/Hotspot name that you want the assembly to appear as in the lowest level “Category Level” column, and entering “YES” under the “Combine Assembly with Lowest Level Category?” column:
Which will result in this assembly acting as a Parts Category/Hotspot in your Parts Catalogue:
This also means that other assemblies and parts can also be moved down the hierarchy and under the assembly parts category if you wish to organise your product this way.
Important Note: Your Parts Categories file must be saved as a “CSV” (comma-separated values) format when you are finished working on it.
Uploading your Parts Categories
Once you have applied the desired parts categories to the assemblies and parts within your Parts Categories File, you can return to the Parts Categories page of your product, and under the “Upload New Parts Categories File” section, browse and select your CSV file, then click the Start Upload button:
While your Parts Categories file is processing, you will be shown a processing screen within your Manage Product section and corresponding product tile within your Product Library while your 3D model and Parts Catalogue are updated to reflect the change to the hierarchy.
As soon as your changes are processed, you will be able to return to the Manage Product > Parts Categories section to view the “before” and “after” views of the product hierarchy, to check the changes that have been applied based on your Parts Categories file:
To see your changes in the 3D canvas, click the View Parts Catalog button next to the right hand “Current Categories” section (or you can go directly to the Parts Catalog from the product tile on the Product Library).
Updating Parts Categories
If you haven’t quite got it right first time, or just want to make some changes to the user’s parts identification journey in future by altering the Parts Categories or how parts are grouped within them, you can return to Manage Product > Parts Categories section, and click on the Upload New Parts Categories button underneath the “previous” and “current” hierarchy views:
This begins the process again so you can download a fresh Parts Categories File template containing your current product hierarchy and make your desired changes, then repeat the process as above as many times as you need to: